I switched from various Eclipse flavours (vanilla, CDT) to IntelliJ IDEA Ultimate Edition almost a year ago and never looked back. The IDE is not only suitable for Java development, but for Python projects as well and I would like to use it when developing Python scripts that ought to run on my Raspberry Pi. Programming directly on the Raspberry Pi using an IDE can be quite cumbersome, since modern IDEs run abysmally due to the CPU and memory limitations of the Pi and unless your a vi guru, you won't have fun with that editor either. I needed a way to write my Python scripts on my development machine, while programming against the Python SDK on the Pi (with all its installed libraries like RPi.GPIO and pygame) remotely. Easy deployment to the Pi would be a benefit, but not necessarily a must-have, since I could live with a simple scp-based solution that copies over project files recursively.
Turns out that IDEA is able to fulfill both requirements to full extent, easing Python development for the Pi tremendously. This short article will guide you through the configuration of a remote Python interpreter and the setup of an module-based deployment to your Pi.
Installing the Python plugin
The Python plugin for IDEA is built from the same codebase as JetBrains PyCharm. So if you are a PyCharm user, this guide applies to your IDE as well, although accessing some menus might be a bit different.
- Open up the Settings dialog and search for Plugins located in category IDE settings.
- Click on Browse Repositories and filter the list of available plugins by Python.
- Select the Python plugin, right-click on it and select Download and Install.
The Python plugin will be downloaded and installed without further user interaction. Once IDEA completed that task, hit apply and close the Settings dialog. IDEA will ask you to restart the IDE.
Configuring the remote Python SDK
- Turn on your Raspberry Pi. I assume that your Pi is connected to your local network.
- Open up the Configure SDK. You need to create a new or open an existing Python project for that. If you created a new Python project, IDEA will ask you to select an existing Python SDK or configure a new one. This will open the Configure SDK dialog. If you opened an existing project, select Project Settings followed by SDKs to open up the Configure SDK dialog as well.
- Click on Add New SDK and select Python SDK. Doing so will yield further choices: Select Remote....
-
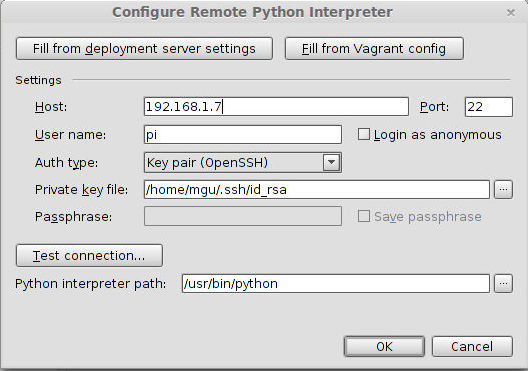
This will open the Configure Remote Python Interpreter dialog. Fill in the connection details. You might end up with something similar to the following screenshot (depending on your authentication mechanism).

-
Click on Test connection... to verify that the configuration is working.
- Apply the settings. IDEA will do the necessary setup for you.
Configuring the remote deployment to the Pi for your project
- Select Tools from the menu, followed by Deployment and Configuration.
- Add a server by clicking on the green '+' in the top-left corner.
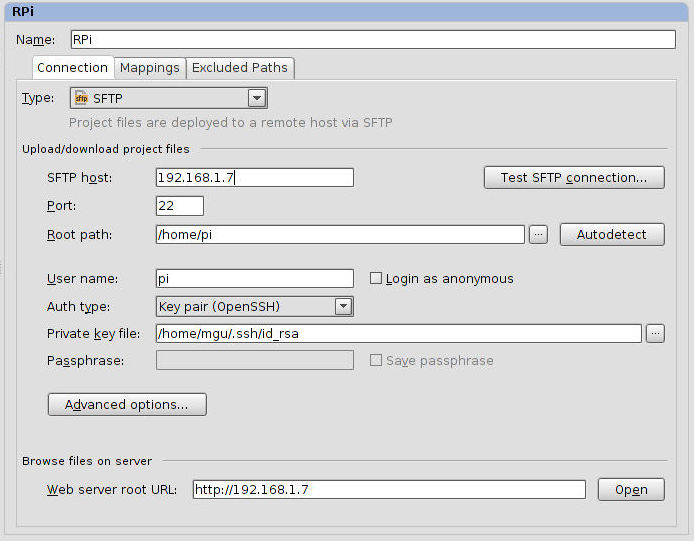
- Give the server a name and select SFTP as connection type.
-
Fill in the connection details (as done before) in tab Connection. Test the connection before applying your changes to the configuration.

-
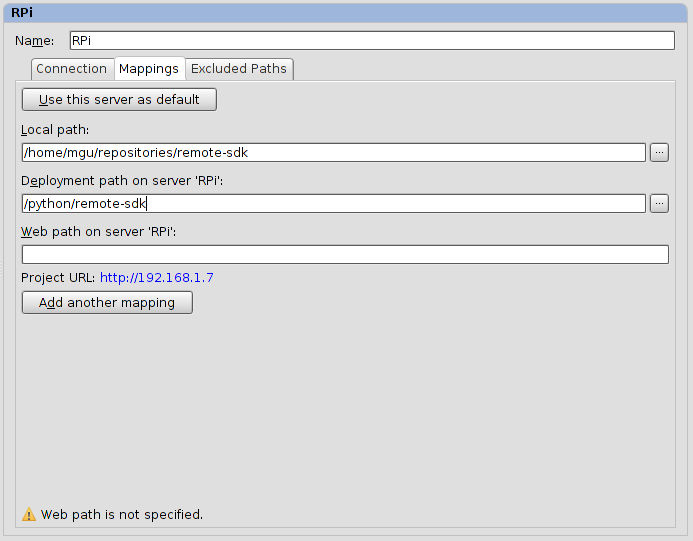
Select tab Mappings. The local path to your project is already filled in. Add the deployment path on the server. Please note that while the local path is absolute, the deployment is relative to the path you specified as Root Path in the Connection tab. In this example, IDEA would deploy the files to folder /home/pi/python/remote-sdk. You do not need to fill out the web path, unless you are programming a web-based solution and require a web deployment as well.

-
Hit Apply to save your configuration.
Selecting Tools → Deployment → Upload to will open up a small dialog which allows you to select the deployment server. After this, IDEA uploads your project (or selected files) to that server, regarding the directory mappings you configured beforehand. To speed up the deployment process, I encourage you to add a keyboard shortcut for that kind of operation. For instance, I mapped the Deploy to action to CTRT+SHIFT+K.
And that's it! With this configuration in place, you are able to comfortably write Python scripts against the Python SDK on the Raspberry Pi, deploy to it and run or debug your scripts remotely.

